
Mercedes 450SL Brake Booster Removal
Stopping what you start, is a great thing to be able to do, especially when it pertains to your car.
In this article we will cover the removal of the power brake booster from our 1975 Mercedes
450SL. While removing a brake booster is not a very complicated job there is little specific
information on the 450SL and the process, so here it goes.
Again, a very straight forward job but you will need a bit of flexibility to pull this off. There are
also several things you may do to make the job much easier. The first is to remove the steering
wheel which is the easiest. The other which is a little more involved, is to remove the driver seat.
Yes that might sound a bit excessive, but if it allows you to do the job and do it well, why not,
because you will be working in very tight quarters.
For this job, I simply removed the steering wheel which gave me ample room to at least move
my head to see upside down. Don’t forget, you can also use a mirror and flash light to look up
all while you are looking down to get a lay of the land under the dash. One high-tech step
further, you can video the underside of the dash area and review your footage prior to starting.
That aside, you must first start the job by removing the driver side courtesy light from the facia
under the steering wheel and then remove the facia itself. To remove the light, simply use a
small trim removal tool an pry out. from the top side of the lens. The unit with light bulb will then
unhook and the unit can be unplugged from the connector.
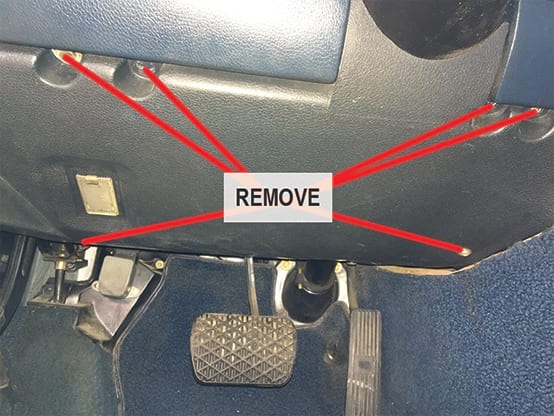
Now unscrew the facia and to do this remove the four phillips screws and washers in the four
recesses of the panel and two on either side down farther near the center console and the other
near the emergency brake.
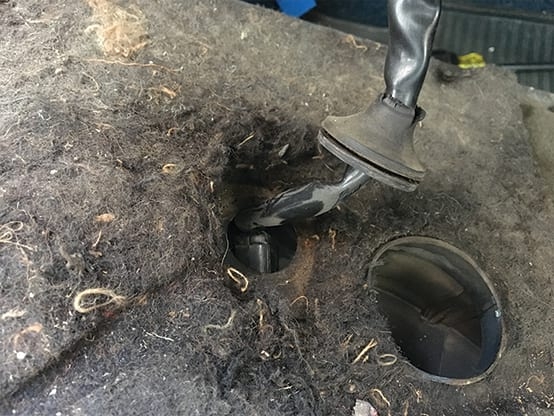
Next, once the facia is lose, gently wiggle it to release it and lower slowly. The courtesy light
wiring will still be attached to the panel and will need to be removed by releasing the rubber
grommet retaining the wire. To release the grommet, grab your trim removal tool again and
gently pry up and pull the wire and plug through and set aside the trim panel. NOTE: Remember
all these parts are very old and very dry and will want to crack and break if you are not careful
and gentle with them.
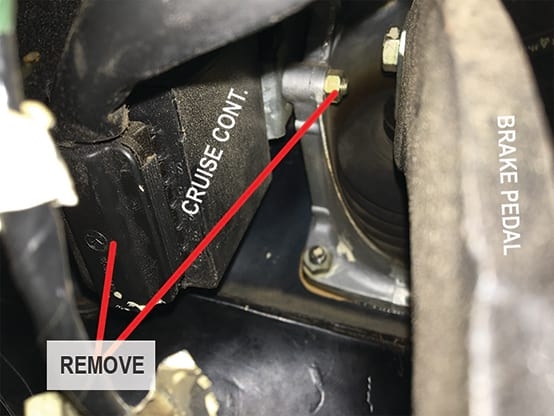
With the panel removed, you are now ready to remove the Ford-Philco cruise control amplifier.
Yes you read that correctly, up to 1976, 450’s had a Philco cruise control amplifier. It will be
noticed by the very un-Mercedes, very American connectors. No need to unplug, just remove
the two units that are joined together to gain much easier access to the lower left nut. NOTE: It
is not absolutely necessary to remove the cruise control amplifier, but it does make the job much
easier for a few extra minutes of time. To remove, remove plug at bottom of unit and remove
bolt as shown.
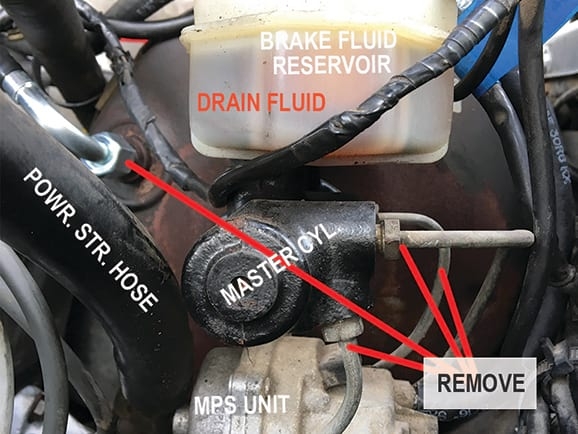
Now you are free to drain the brake reservoir and remove the three metal brake lines attached
to the master cylinder. IMPORTANT: DO NOT LET ANY BRAKE FLUID GET ON PAINTED
SURFACES! Once the brake fluid has been drained and the lines removed, unbolt the master
cylinder (2-13mm bolts) from the booster and remove reservoir and master cylinder as a unit.
You will also need to remove the vacuum line to the brake booster.
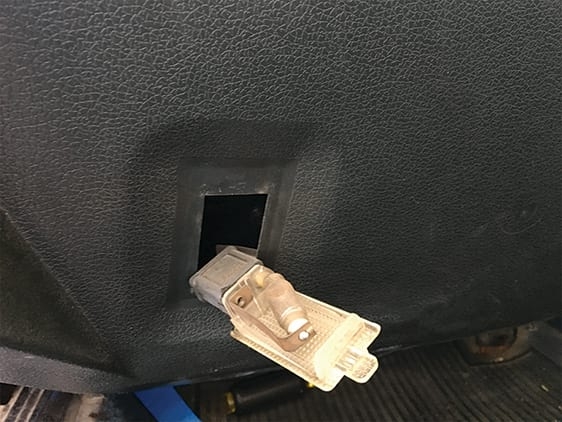
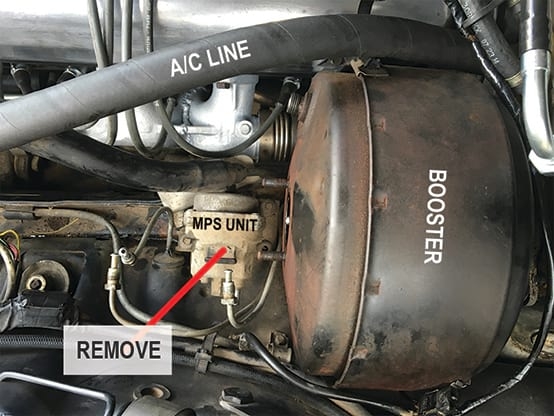
While you are still under the hood, you will also need to remove the Manifold Pressure Sensor
or MPS which is part of the D-Jetronic fuel injection system noted in above photo. This must be
removed in order to give ample room to pull the brake booster forward and up to remove. To
remove, pull off vacuum hose and unplug pin connector.
Back under the dash with a 13mm socket, extension and universal joint for flexibility, remove the
three nuts retaining the booster. While there are four studs coming off the booster, only three
nuts are needed as the upper left is impossible to reach. These nuts should not be mounted
with super human strength and so should be relatively easy to free up.
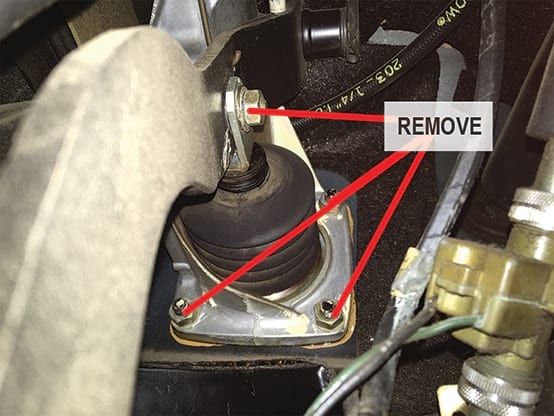
Once the three nuts and associated washers have been removed, remove the bolt that retains
the brake pedal to the booster fork as shown in photos above. To remove the bolt however you
will need to remove the metal bushing from the right side while wiggling the bolt on the left.
Now that the brake pedal is free from the booster you may now pull the booster from the engine
bay. NOTE: You may need to cut the plastic zip tie that holds the A/C line in place if it has not
disintegrated in the meantime. If you are missing the plastic ties, they should be replaced with
new to avoid hoses, wires, etc., from rubbing other components and wearing through.
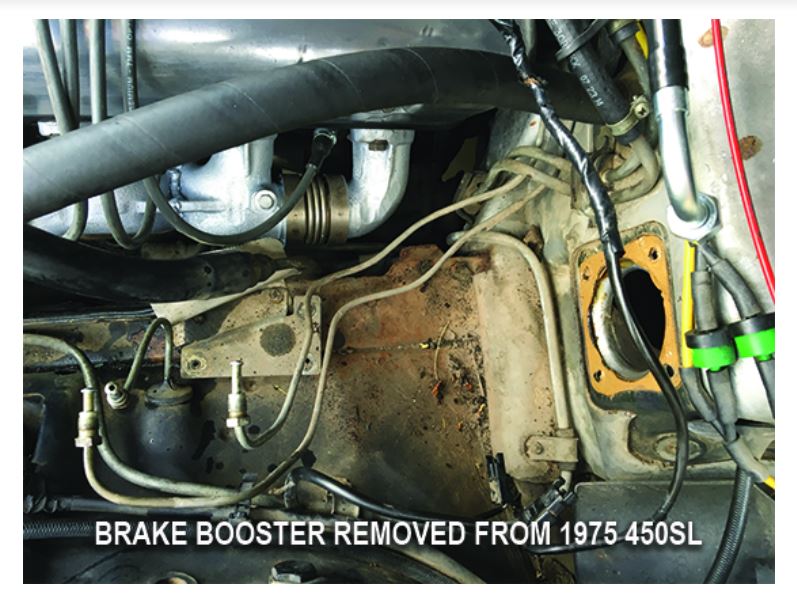
You are now ready to clean up 40+ years of debris and either reinstall a new brake booster or
send your original out for restoration. There are several companies that rebuild vintage
boosters, which is what I am having done now.
Be sure your remaining components, brake master cylinder, reservoir, reservoir grommets and
wiring are all in tact before reinstalling and refilling. I will not cover refilling and bleeding the
brakes as many articles have been done on this subject here on the FCP blog and else where
on the internet.
PARTS NEEDED:
- Brake Booster
- Master Cylinder
- Master Cylinder Grommets
- Brake Fluid
- Brake Fluid Reservoir
- Brake Fluid Reservoir Caps
- Brake Fluid Reservoir Strainer


