- 02/24/2015
- 4 Min Read
- By: Noah Jenkins
How to Install a 2000 Volvo V70R Steering Wheel (P80)

Many people who own P80 70-series Volvos know that there are many desirable parts between the models which are a direct swap onto any of the cars. Back when I was looking for a new daily driver, I test drove a 2000 V70R for the first time (why I didn't buy it is another, regretful story). I noticed that the steering wheel was much thicker than that of the other S & V70s that I had driven. The knowledgeable owner of that V70R informed me that the 1999 and 2000 V70R models came with an upgraded leather steering wheel which had a slightly thicker wheel diameter and more pronounced grips at the "10" and "2" positions.
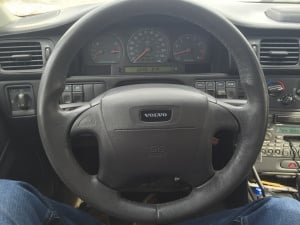
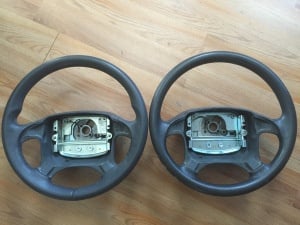 2000 V70R Wheel on Left, My S70s non-leather "base" Wheel on Right
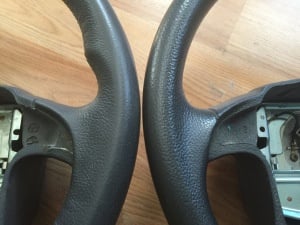 Rim Thickness and Thumb Holds (00 V70R on Left, My S70 on Right)
After purchasing my S70, I knew that wheel was something I just had to have in it. I would be a night and day difference since my S70 came equipped with the base, non-leather wheel. This wheel was quite hard to come by. I've had my car for almost a year now and just recently have seen one in good condition pop up for sale on a Volvo forum classified page. Due to their rarity, expect to pay north of $100 for one. However, if you just have the base wheel like I do, finding just a leather wheel will be much easier and less expensive and it would still make a great upgrade to boot!
In this DIY I am specifically removing my S70s wheel and changing it to the 2000 V70R wheel. However, the removal and install applies to all the 70-series steering wheels. This should take the average DIYer about 30min -1hr to complete if you use the tools I used.
Note: Use the airbag from your old wheel. The 99-00 Models used a different connector for the airbag which is not compatible with the 98 models. So you don't have to worry about airbag functionality, just use the airbag from your old wheel.
 Tools:
- 3/8" Ratchet
- 1/4" Ratchet
- T30 Driver
- T25 Driver
- T20 Driver
- Long T30 bit
- 3/8" Long & Short Extensions
- 18mm Socket (6-point would be best)
- 10mm Socket
- 1/4" Socket
- Vice Grips (Not pictured)
Disconnect the Negative Battery Terminal
Self explanatory but a VERY important step none the less. You MUST do this since you will need to disconnect the airbag. If you don't, an SRS light will be illuminated upon reconnecting it. Here I used the 10mm socket and 1/4" ratchet to loosen the bolt for the clamp on the negative terminal cable just enough to pull it off. Set it aside in a manner that it cannot move and some how make contact with the terminal again.
NOTE: Make sure you have note of your radio code somewhere as disconnecting the battery will require you to need to enter the code upon reconnection and powering on your radio.
Removing the steering column covers
Begin by using the arm on the left side of your steering wheel to adjust the wheel all the way down and telescoped fully towards you. This will make removing the collar and wheel much easier.
The column cover has a top and bottom. Start by removing the 3 screws on the bottom of the column. These are all T25s. Don't worry about which screw went where as they are all the same. Set them somewhere safe.
 T25s Underneath Steering Column
After removing the screws, pull the adjustment arm on the left into the down position and if you have your key in the ignition, remove it. Carefully separate the top part of the cover away from the bottom. The top cover can remain attached to the bottom of the dash via the boot at the top. The bottom cover must come off, so, with a little bit of bending and careful pulling you can slide it from around the steering column adjustment arm on the left and the ignition slot on the right. Set aside when complete.
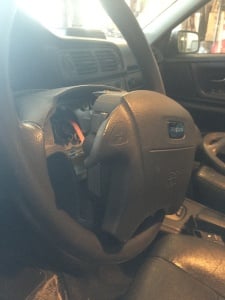
Removal of the airbag
There are only two screws on the back of the steering wheel which hold the airbag in. Rumor has it that you must remove the right screw first (when looking at the wheel from the front) and then the left screw, otherwise the horn will not work. I'm not sure if this is true, but I was not willing to find out, so I did as recommended and removed the right first, then the left. Installation was done the same way as well, right first then left.
Put your key back into the ignition so the steering wheel does not lock.
Turn the wheel about 90º to the right, which will position the right screw underneath the steering column so you can access it.
The airbag fastening screws on the back of the wheel are T30s.
Here is where things get tricky and you might have to get creative!
These screws are in pretty tight and I initially tried turning them by hand with a T30 driver. With the awkward placement of my hand to turn the driver, I simply could not break them loose this way. I decided to then try attaching vice grips (very tightly) to the driver and attempting to break them free that way. This has worked for some successfully, but did not work for me.
This is where I got creative. Because of the recess of the screws, I needed something small enough to fit in the recess hole and still have room at the end. I found a T30 bit that was about 2" long and wedged it into a 1/4" socket. I then placed this on my ratchet and, using the short 3/8" extension, was able access and remove the screw. Once broken free, they turn easily. The screws won't come all the way out.
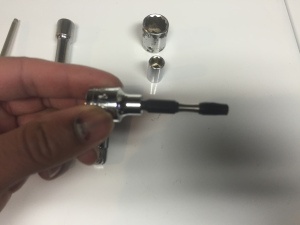 T30 2" Drill Bit in 1/4" Socket
After doing the right screw, turn the wheel 180 degrees to the left and remove the left one. The airbag will then pull straight out. Un-plug the air bag and set it aside. Turn your wheel back to center.
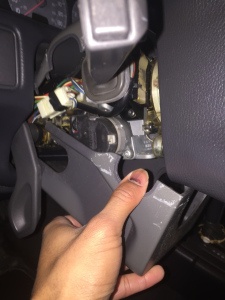
 Airbag Removal
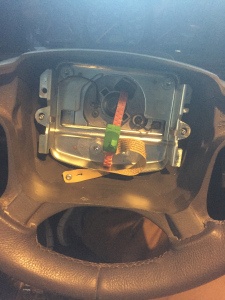
Preparing the wheel housing for removal
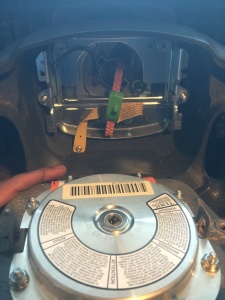
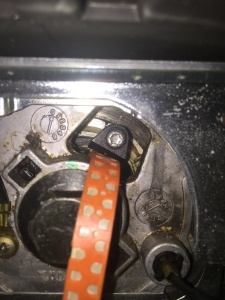
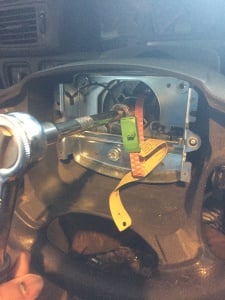
You will notice a small T20 screw in the bottom left corner of the wheel holding a yellow ribbon. Remove this and screw it into the tiny hole in the clockspring. This holds it in place to maintain orientation while the steering wheel is removed. If the clockspring spins and orientation is not maintained, it can be damaged by turning the wheel lock-to-lock in the future.
 Note the T20 holding the yellow ribbon in the lower left inside the wheel.
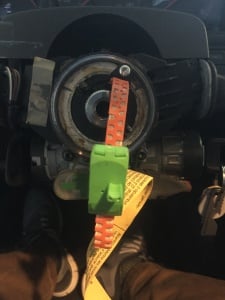
 Fasten the clockspring
If you have not already, remove the key from the ignition and lock the wheel in either direction. This will keep it from turning when removing the 18mm bolt.
5. Removing the wheel
Using an 18mm socket, long extension and ratchet. Break loose and remove the bolt in the middle of the wheel. DO NOT remove the wheel yet once the bolt is out.
 Removal of 18mm Bolt
Now is a good time to mark the center with a sharpie or something to ensure you line the new wheel up on the splines properly. There was a small green line on mine already.
Pull the wheel straight off being careful not to damage the airbag connector assembly.
 Note the faint green marking at the top of the column splines
Installation of new wheel
Install is just the reverse of the removal. Be mindful of a few things:
On the new wheel, mark the center on the metal right above where the bolt goes so you can line the two marks you made up and ensure you put the wheel on straight. I didn't do this the first time and after everything was back together and I went for a drive, the wheel was cocked ever so slightly off center. Mark it and align it properly, it takes two seconds to do and could save you from doing this job twice!
Do not forget to remove the T20 screw from the clockspring and return it to its place in the lower left hand corner of the new wheel to hold the airbag connector ribbon.
The air bag plug should "click" to confirm it's connected properly.
When fastening the airbag retaining screws - right one first, then the left one... Unless you want to be the one to test the horn not working theory!
Enjoy your new wheel!
About the Author: Noah Jenkins
 Noah Jenkins is attending the University of Connecticut studying Electrical Engineering. He’s been around Volvos since birth and currently drives and maintains a 1998 S70. His knowledge and interest in European vehicles expands to BMW, Audi, and Land Rover as well.


