
One of the most effective ways to make sure your classic diesel Mercedes keeps on ticking for a long time to come is to stay on top of fluid changes. In between changes, however, all of the fluids in your car shouldn't just be ignored. Slow leaks can gradually drain the pans and reservoirs that hold the critical life blood of your car's engine, brakes, and other systems until one day something goes wrong.
Additionally, with some of your car's fluids, a visual check can provide an indicator that it is time to change the fluid.
Knowing what fluid to check, and how to check each fluid accurately, is especially important if you do not do any of these changes yourself! While you local shops are a great resource, you should never trust anyone else but yourself to keep an eye on the important fluids in your pride and joy!
Learn how to properly check each fluid in your car, one by one, by reading on.
Checking engine oil
Engine oil level is critical in a diesel engine. As these engines age, the high compression levels seen in them tend to push oil past aging seals at a greater rate than similar gas engines. Therefore many of these lovely old diesels tend to weep a fair bit of oil between changes.
Your oil should be checked after driving the car, with the engine warm, but after letting it sit turned off for 5-10 minutes.
Start by locating the oil dipstick. It is capped in a red handle to help you identify it, and pull it out easily.
Pull out the dipstick as straight up as possible. Have a clean shop towel ready to put underneath it to catch any drips.
Wipe the dipstick clean. The oil on the dipstick after pulling it out for the first time may not reflect the oil level accurately. While the dipstick is clean, not the two sets of notches - they are important in the next step.
Now re-insert the dipstick all the way and then pull it back out again. The oil on the dipstick this time will accurately reflect the oil level. The "FULL" mark on the dipstick is the notch highlighted in blue here, further from the tip. The "LOW" mark is highlighted in red. If the oil is anywhere between these two marks it is fine to leave well enough alone. If the oil is at or below the "LOW" mark it is time to add some oil.
Note that while, in theory, the difference between the two notches is about 1 quart it is better to be safe than sorry. Add about 1/2 quart and check the level again before adding the rest. Never overfill a diesel engine with oil, as it can potentially lead to a runaway.
Checking coolant, on both turbo and non-turbo cars
The other lifeblood of your engine is your coolant. This fluid doesn't get changed very often - perhaps every 2-5 years depending on the type being used. Even a very slow leak can leave you running dry sometime before your next change so check your coolant often.
Always check fluid when the engine is cold, ideally after it has been parked overnight. This is especially true on the non-turbos as you need to open the system to check the fluid, and opening a hot cooling system is dangerous is not deadly!
On the non-turbo cars, locate your radiator cap. It will be right behind the grill area when you open the hood.
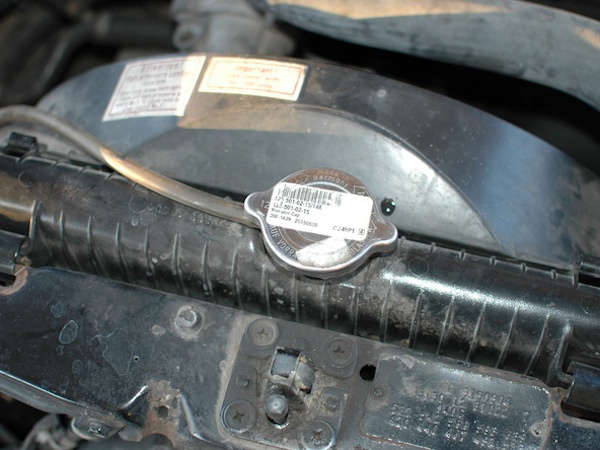
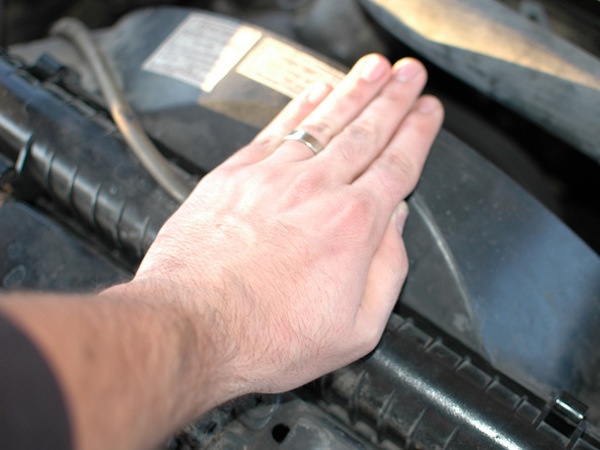
Use the palm of your hand to press down on the cap while turning it to open the radiator fill neck.
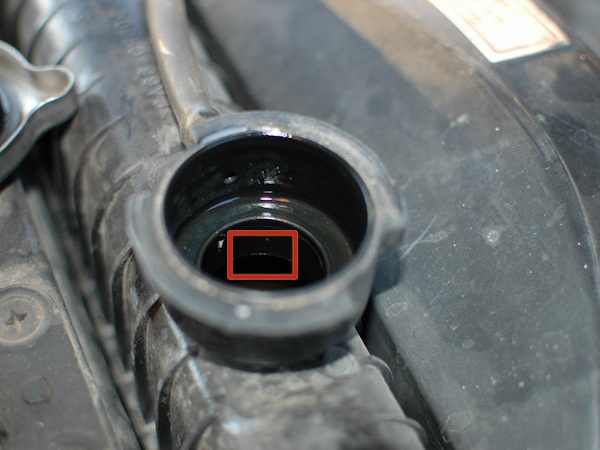
With the radiator cap removed and the fill neck open you can check coolant level. A flashlight may help if you're doing this in a sunny spot. Look down the fill neck and see if coolant is at or near the bottom of the fill neck, as highlighted below. If it is, you are good! If not, add coolant until it is at or near this area. This isn't an exact science - if it's not quite there, it isn't too concerning; if you go over, a bit of coolant may dribble out of the overflow but it won't hurt anything.
On the turbo-equipped cars, Mercedes installed an expansion tank. This makes checking coolant much faster. Again, check the coolant with the car cold as hot coolant expands and may show a false reading.
Start by finding your expansion tank. It looks like this.
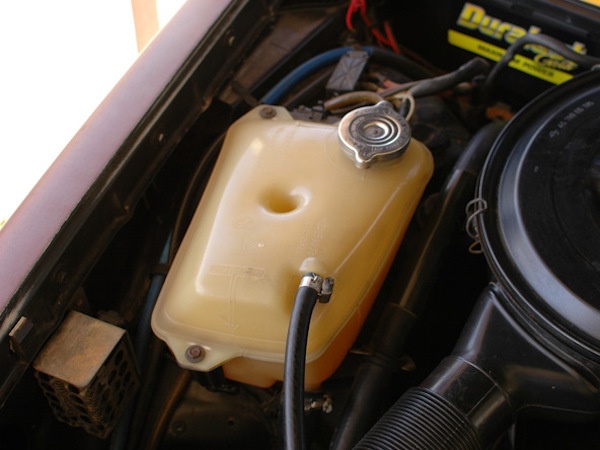
You'll see an arrow pointing to a mark that runs along the front face of the expansion tank. Above the arrow is the word "kaltwasserstand" which is German for cold water level. This is why you need to check the level with the engine cold - there is no line to note the proper level with hot coolant.
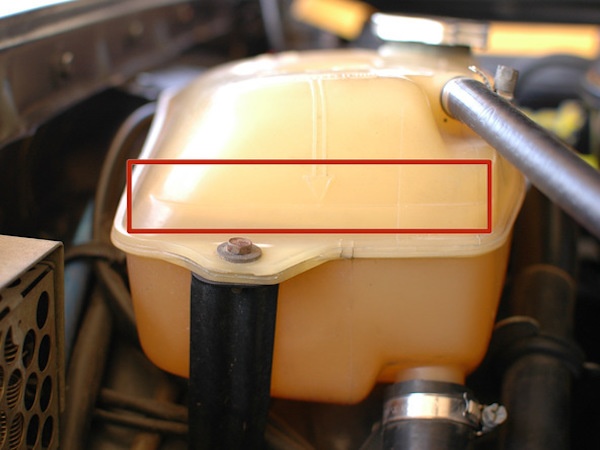
If there is coolant up to or near this level, all is well. If the level is much below this line, top it off. Again, never open the cooling system when the engine is hot!
Checking brake fluid
While some may argue that engine oil and coolant are the most important fluids in your car, I would argue that brake fluid is! While running low on engine oil or coolant may leave you stranded with a dead engine, running out of brake fluid may leave YOU dead!
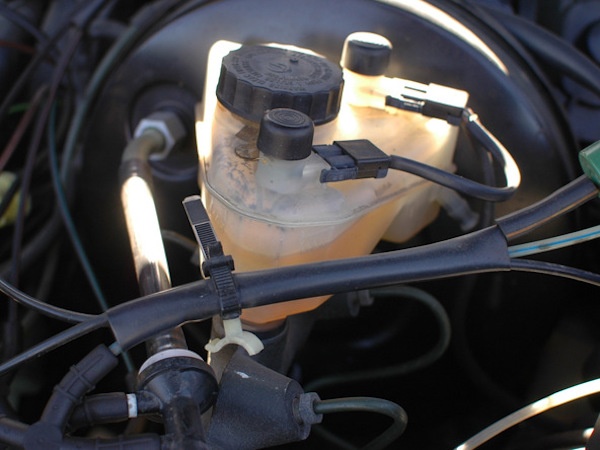
To check brake fluid, start by finding the brake fluid reservoir. It is under the hood, at the back of the engine bay, on the left/driver's side. It looks like this:
Start by checking the fluid level at the front of the reservoir. It should be at or near the "MAX" mark but certainly not at or below the "MIN" mark.
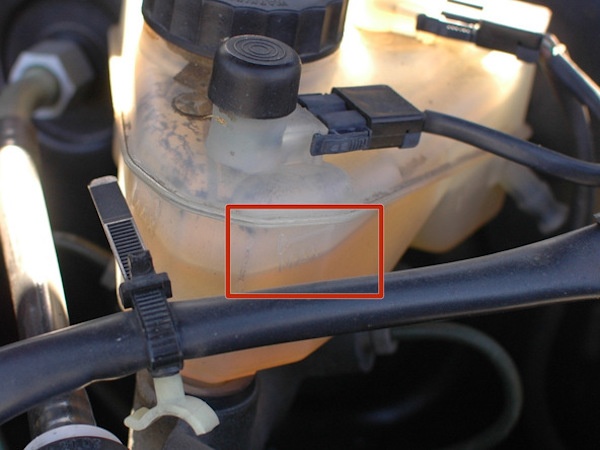
This is where many DIY'ers stop, not realizing that the design of the reservoir for the brakes makes this an incomplete check! Note that the system is split into two sub-systems, with a baffle in between. The system is reversed, by design. The fluid in the front of the reservoir supplies the rear brakes. The fluid at the back of the reservoir supplies the front brakes. This is so that, for example, if the rear left caliper springs a leak and you lose all brake fluid in the front of the reservoir there will still be fluid in the back and your front brakes will still work. It is a safety feature!
What this means is you'll need to check both sections of the reservoir in order to get an accurate reading of brake fluid level. Check the rear half of the reservoir again looking to see that fluid is filled to the "MAX" mark.
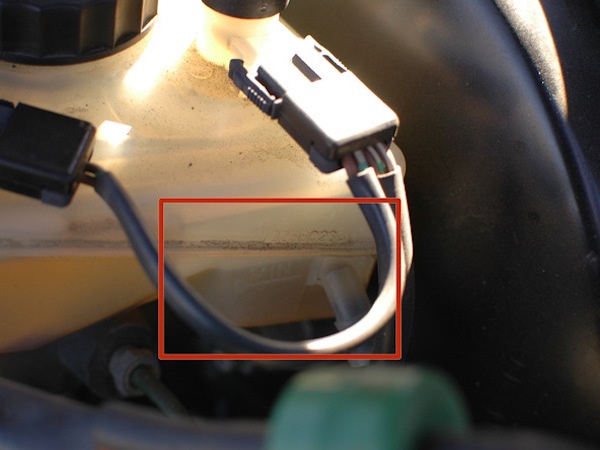
You can see that in this case the fluid is almost to the "MIN" mark. This car had a slow leak that was caught with regular fluid checks.
Another reason to check the brake fluid is to see what color it is. DOT 3 and DOT 4 brake fluid darken as they age, and take on moisture. The darker the fluid the older it is. While brake fluid should be changed every 2 years at the longest it often gets left longer. If you see dark brake fluid in your vehicle, take that as a sign that it should be changed right away.
Checking power steering fluid
One of the most often neglected fluids on these cars is the power steering fluid! The reasons to check this are more than just fluid loss due to leaks, although these are common from leaky steering boxes - it is also to see that the fluid is not too old a dark/dirty.
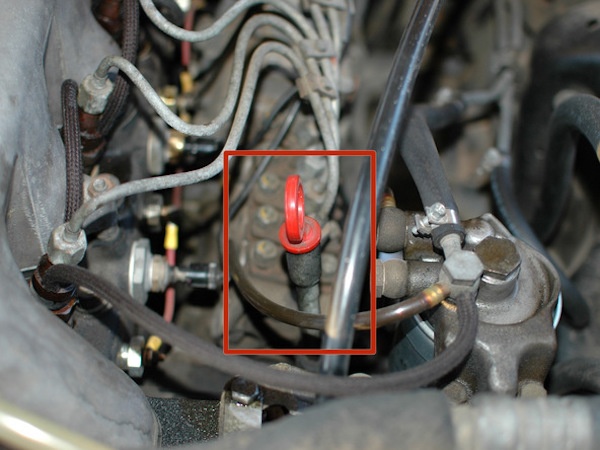
To check the fluid, start with finding the reservoir. It is hanging off the front left / driver's side of the engine. It looks like this. Once located, you can remove the nut on top - it may be a wingnut or it may be a small (likely 10mm) nut.
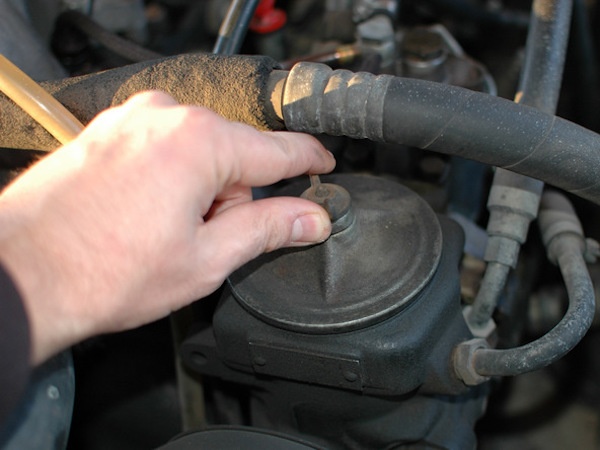
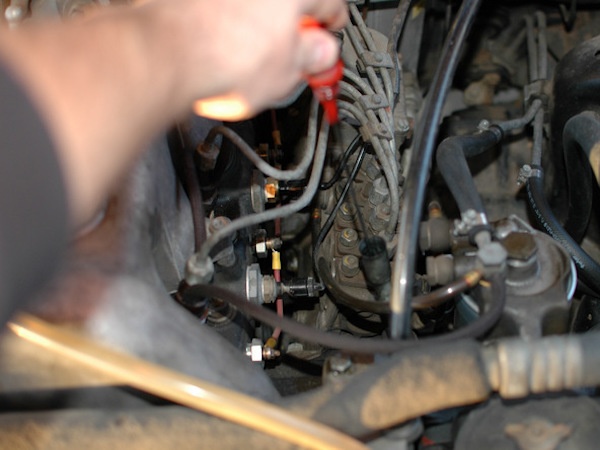
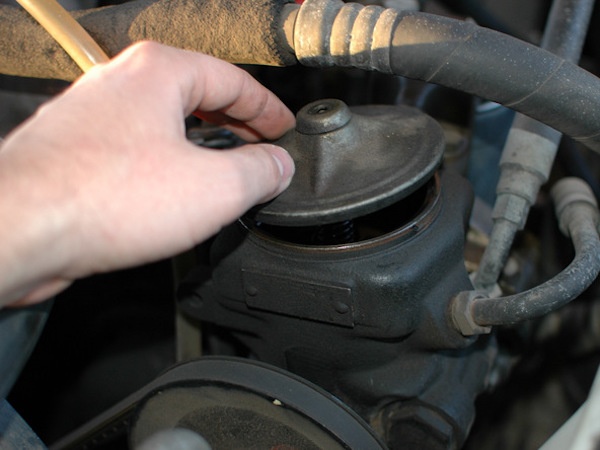
As you loosen the nut and lift it up, hold the cover down. There should be a spring underneath that makes it harder to unscrew the retaining nut and that can also cause the cover to pop off unexpectedly. You can see this spring in the next picture.
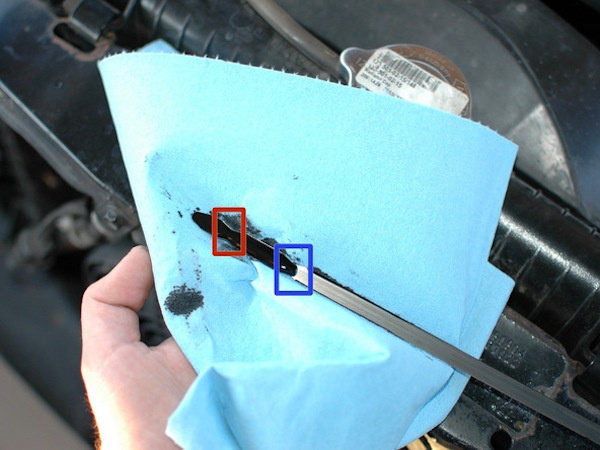
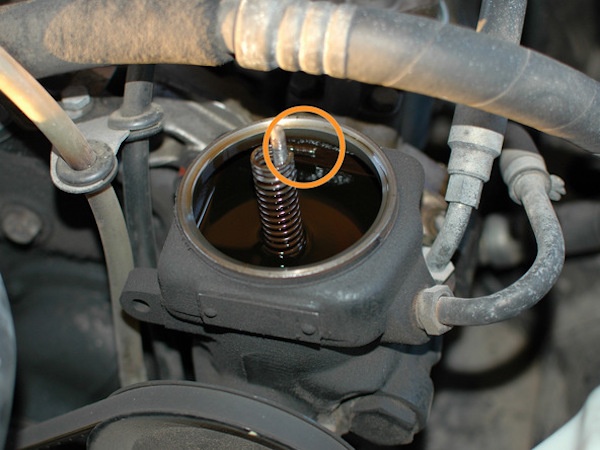
With the cover off, check that the fluid level reaches the raised mark on the back wall of the reservoir, circled below. Also check the fluid to see if it appears dirty. The fluid in this car was well overdue for a change and was very dark.
Checking differential fluid level
Another often ignored fluid on these cars is the differential fluid. It can leak from a bad seal on the differential cover, from the pinion seal, or from either of the two axle seals. It only holds about 1 liter of fluid, so it can run out pretty quickly even with a slow leak. Keep an eye out for wetness and check the fluid level if you see any.
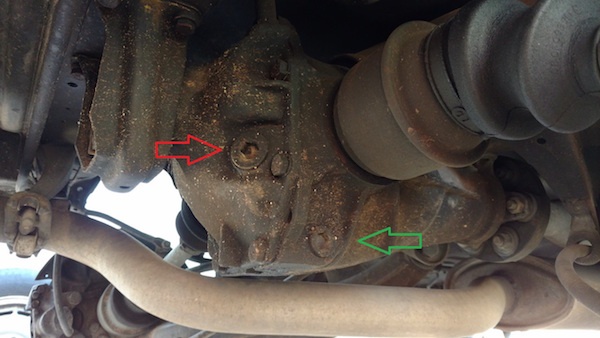
To check differential fluid level you will need to lift the rear of the car safely on jack stands. Then, find the rear differential. It looks like this. Highlighted with the red arrow is the fill plug. The green arrow points to the drain plug, which you will not touch during a fluid level check.
Use a 14mm allen socket to open the fill plug.
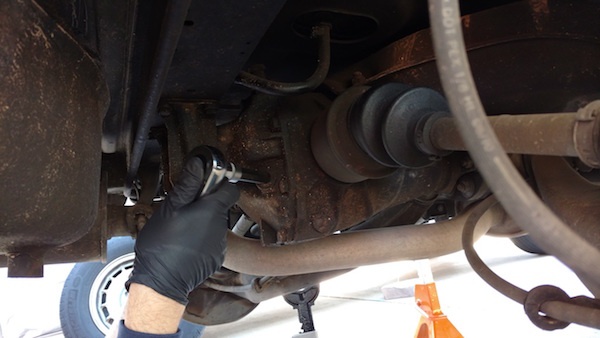
Once it is open, simply insert your finger (covered in a clean glove). The fluid should be right at the bottom of the hole for the fill plug. If not, top it off with differential fluid until it begins to drip out of the fill plug hole.
How to check transmission fluid level
Checking transmission fluid level on these cars is very tricky and fraught with some risk, especially if you misread the fluid level and overfill the transmission. The best bet is to follow, to a T, the instructions in the factory service manual. A link to the PDF of the section describing the method for checking transmission fluid level is below:
Click here to read the Factory Service Manual section on checking transmission fluid


