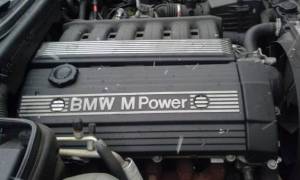
As winter rolls in with the holidays not far behind. I took it upon myself to perform my routine seasonal maintenance or Salt Belt preparations on my beloved Grau. A 1995 Arktis Grau Metallic, Full OBD-I converted E34 S52b32 swapped BMW 525i. (In layman's terms, it has an E36 M3 engine.) Upon completing my list of tasks which usually consist of a basic tune up, battery check, change of air intake, oil and cabin filters, all fluids and making sure my wipers were up to snuff. Finally it was time for the ceremonial firing of the cylinders. A turn of the key, and he starts up quickly and begins to purr. The weather being a bit cold, I allowed a little time to get the car to operating temperature, and took the old boy out for a romp around town.
 Being this was the first time this year the heat was being used I opened up all the vents to let the warmth flow through the cabin. Instead, during this spirited drive I began to notice a horrid smell and some smoke coming from the vents. This was not the noticeable sweet aroma of a coolant leak or failed heater core. Nope, this was the pungent smell of an oil leak dripping onto the exhaust. I immediately ended our trip short and brought Grau home for inspection.
Theory and the hunt
To many enthusiasts a leaking and/or oil thirsty M5x or S5x isn’t uncommon - at some point they all do. However this is not the case with Grau. Over the summer the engine was rebuilt from the ground up, making it one of the more quiet S52s I’ve had the pleasure to hear and drive. Cleaning, inspection and repair of any mating surface defects on the cylinder head was handled by my local machine shop prior to installation. Attention and modifications were performed to the oil pan and pump. There were no pending services related to the engine aside from a VANOS service I recently performed. So, I knew the engine was healthy. However, the engine had been consuming a little more oil than expected, so I had been keeping close watch on my oil levels which lead me to believe the leak and excess oil consumption were related. My theory, the valve cover gasket was not seated correctly.
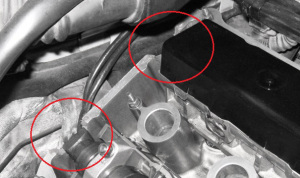
On the rear of the head are two half-moon shape surfaces or cam divots. If the gasket is not seated properly it will create a leak. Armed with an LED flashlight, some brake clean, a compact mirror (thanks to my wife) and a homemade shop rag, I popped the bonnet and commenced my search for the leak.
After a physical and visual inspection of the rear end of cylinder head I located the oil burn marks on the exhaust down pipes. From that point of direction I used the mirror and flash light to verify any leaks from the head. To my findings the valve cover gasket had indeed slipped out-of-place at the cam divots. Rag in hand, a few squirts of brake clean, and some vigorous scrubbing. I removed the oil traces from the head and exhaust and proceeded to perform the repair.
The Repair
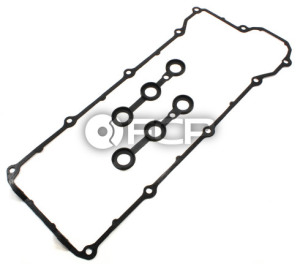
Using a 10mm socket wrench, I removed the vanity cover, coil packs, removed the crank ventilation hose and finally removed the grommets and nuts releasing the valve cover. After close scrutiny I discovered my thought was spot on. The rear end of the gasket was buggered up leaving a small gap where the gasket sits in the half moon cam divots. This allowed small amounts of oil to pass through ultimately leaking on the exhaust and raising my oil consumption. Being the gasket was recently installed I could have tried to lift and realign the old gasket. However attempting to reuse a used gasket could inadvertently create a pinch or kink therefore not allowing the cover and the head to seal perfectly. To be safe, I opted to replace the gasket and administer some fresh RTV sealant.
Promptly I removed the botched gasket and cleaned all oil and RTV from the mating surfaces. Moving forward I carefully laid down two dabs of new RTV, at each seam where the Vanos unit meets the cylinder head and another four at the crests of the half moons. Next was the installation of the new valve cover gasket. Once the gasket was in place I verified the rear of the head and gasket were perfectly aligned. Finally, I buttoned everything up and went for refreshments to allow the RTV to cure for a few minutes. Returning to the car, I fired it up, rolled windows down, vents open, heat on fan on 3 and made observations of any changes or improvements as I drove. Our job was a success. Mission accomplished.
Final Thoughts
When performing a valve cover gasket or any gasket for that matter you have to ensure that all surfaces mate evenly. Any diversion from this can create horrible results. I was lucky. I knew the condition of the engine prior, was able to pin point and remedy the culprit quickly. If left untouched it could have resulted in a more extensive oil consumption issue, and possibly a more costly repair. That said, I’m happy to report that Grau has not leaked since and we’re ready for winter fun.