- 11/25/2014
- 2 Min Read
- By: William Yelder
1989-1995 BMW 5-Series Headlamp Removal and Replacement

Ownership of an early model 1989-1995 BMW 5-Series is a pleasure that is best described by driving one. It’s an experience that an avid enthusiast wouldn’t trade for the world. Unless it's for an early model, M3, M5, M6, or Alpina B series. Then the response may differ. Unfortunately there are moments in ownership whereas our cherished companions must have some parts replaced. One such instance is the repair and installation of headlights.
 These iconic projectors which later BMW models pay homage to have a tendency to become cracked, pitted, and brittle due to age, environmental exposure or the occasional salt truck slinging cancerous projectiles. There are numerous fixes for headlamp damage. However headlight replacement is the more efficient way to extend the life of your lighting system. No worries. I will give you a brief rundown on this procedure.
When replacing headlamps a few simple tools will get the job done. You’ll need a decent length thin shaft Philips head screw driver, a flat head screwdriver, 17mm socket and ratchet or factory lug wrench, needle nose pliers.
The Process
When removing the headlights you must remove the front bumper. If you have trims with side marker lens in the trim use a flat head screw driver to press against the tension clip on the back of the side marker and it should lift it from its seat. Standing in front of the car, use the marker openings for leverage to pull the trims toward you. Those of us with European trim, (no side makers) the process is relatively the same. The exception is instead use a flathead screw driver at the end of the trim closest to the wheel well and push the trim forward.
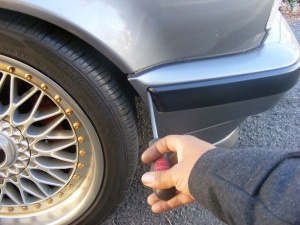 For both, you could try prying the front of the trim from the edge where the vanity trim meets but it can cause minor cosmetic damage. The trims have angled tabs on side and straight tabs on the front of the trim. If the trim is not removed correctly the tabs can bend or break. So take care in removing them. If possible reach under the bumper and disconnect the fog lights and ambient temperature sensor. This makes life much easier than waiting till you have the bumper completely off the car. For not every wiring harness is long enough to extend that far. Which could lead to scratching the bumper on the ground. Not fun. Wiring disconnected, trims off, you're now ready to remove the bumper.
With 17mm socket & and ratchet in hand remove the 4 nuts from the studs holding the bumper to the impact struts. If a socket set isn't at your disposal the OEM lug wrench will work just fine. Alternate to both sides holding the bumper within the wheel well and another along the front of the bumper, slide the bumper forward. With both hands holding the bumper, carefully set it to the side.
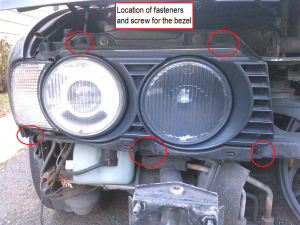 You should now have a clear shot at the grill trim and kidney grills. On the grill trim there are a series of tabs, two tabs directly under both corner lights, two in the grill which lock into the support bracket behind it, 3-4 under the kidneys and another 3-4 above the kidneys. Using the flathead screwdriver, push them in to release the grill trim. At this point use the Philips head screw driver to remove the 4 fasteners and one screw holding the headlight bezel in place. Bezel now to the side, the headlight assembly is accessible. There are a few ways to remove the headlight from the assembly. Due to space I prefer to remove the entire assembly. There are three screws in the front and one in the rear right below the low beam and corner signal light.
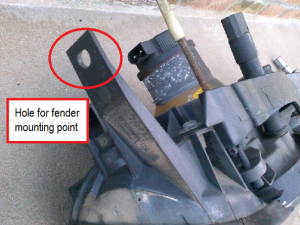
On some models there is a second screw. It fastens the corner signal light to a grommet on the unibody behind the fender. I advise looking inside the fender for that screw before pulling the assembly out. Use a flashlight if necessary. Unscrew both of these screws. Disconnect the other headlight from the wiring harness. Unscrew the three screws in the front and lift the assembly from the car. Yeah!!! Almost done.
 Now with the needle nose pliers release the damaged light from the assembly by turning the plastic locks attached to the mount posts under the lamp housing. Turn the lock left or right to free the post from the bracket. Be careful when attempting to turn these locks from the rear of the bracket. If they’ve seen a lot of road time. They may be fragile and will crack or break off. Resulting in you having to purchase new mount posts.
With all the posts free you can remove the damaged headlamp from the bracket. You can install the older posts into the new lamp(s), but it’s a little tricky. The rubber/plastic bushings that secure the head of posts to the lamps usually break. I suggest if you’ve never done this job save yourself the time and frustration - Purchase new posts and bushings.
If you’re familiar with the job and plan to reuse the posts and bushings then you’re basically done and re-install is the reverse of removal. If you have purchased new mounting hardware then you have one more step.
 All the mounting hardware replaced, the headlamp is probably going to be misaligned and the beam of light emitted will need correction. To perform the beam alignment you’re going to turn the mounting posts. One has a long plastic handle and is located in the top corner behind the mounting bracket next to the fender. The other is located in front lower part of the bracket near the kidneys. Grabbing your Philips screw driver and pliers turn the mounts till the headlight is at a perfect level and brightness. You can do this prior to reinstall of bezel and bumper or after everything is buttoned up. Using your garage door or a brick wall will help you zero in on the desired height and light pattern.
About the author: William Yelder

William is an enthusiast, entrepreneur, and BMWCCA member from Freehold, NJ. Preferring the classic lines over modern convenience, he’s continuously improving the performance of his ’95 BMW 5-Series… One bolt at a time.